Happy New Year!!

Hello everyone,

I have a quick card to share.  On this card, I stamped my lanterns (Butterfly Silk) in a rainbow of colors, added the sentiment (Greetings) and few enamel dots.  

I want to wish you best of luck, happiness and good health for the New Year!

Thanks for stopping by!


Thinking of You

Hello friends,

Today, I'm sharing a card made with Crafter's Companion products: Floral Fancies, Dreamy Daisies, Hessian embossing folder, and Spectrum Noir markers (BP2, PL1, PP1, CG1).

I created my texture background with the embossing folder.  On a piece of card stock, I stamped, colored my Hibiscus flowers and cut them.  The sentiment stripe was white embossed.  Finally, I assembled my flowers and the sentiment over the textured panel.

Thanks for stopping by, have a wonderful day!


Merry Christmas!!!

Merry Christmas everyone!

I have a non-traditional colored Christmas card to share.  I want the card to be cheerful and fun, so I chose Distress Inks: worn lipstick, tumbled glass, and mustard seed for the background.  The stamps used on this card were: Santa's DeliverySeason's Greetings.  To color Santa's sleigh, I used several markers:  Spectrum Noir (TN6, FS3, DR1, and DG3), Sparkle Pens (harvest moon, aquamarine, and clear).  

I hope you have a wonderful time with your loved ones!  


I'm submitting this card to SSS Monday Challenge: Winter Wonderland

Merry Christmas Eve

Hello and Merry Christmas Eve friends,

I hope you are having a wonderful time with friends and family.  

I'm here to share another card submitted for SSS Wednesday Challenge: Make It Sparkle and SSS Monday Challenge: Winter Wonderland.  On this card, I used: SSS Peace on Earth, Echo Park Oh Christmas Tree Stencil, and Distress Ink Evergreen Bough.  The "holiday" was die cut out of glitter paper.  

Thanks so much, Happy Holidays!


A Card for Simon Says Challenges

Hello,

Just a quick post to share a card created for Simon Says Wednesday Challenge: Make It Sparkle and Simon Says Monday Challenge: Winter Wonderland.  I used SSS Snowflake dies on some glittered paper to make the snowflakes.  The sentiment is from TAWS Mistletoe Kisses.  And the background is Distress Ink Tumbled Glass.  

Thanks so much for stopping by!  


Red and Gold Joy Card

Hello,

Today, I'm sharing a bold color Christmas card using inlaid technique.  This Joy die is by Crafter's Companion.  First, I place the die on a piece of red card stock, ran it through my Big Shot.  Before removing the Joy image, I placed a piece of double sided tape behind the card stock, so when I removed the image, the negative detailed pieces stay put.  Next, I die cut "Joy" on a piece of gold card stock, and placed it on the red card stock.  It'd fit right in between the red details.

Thank you so much for visiting, have a great day!


Silent Night

Hello friends,

Have you finished making Christmas cards?  I still have more to make.  This is one of the designs I made for my kids' teacher.  I made a box of cards as a Christmas gift.

This card is so easy to make.  I started out with masking the borders on my card base.  I used Distress Inks Faded Jeans, and Dusty Concord to create the night background.  The pine trees are part of the Die'sire Scenic Pines die by Crafter's Companion.  I die cut and adhered the pine trees over my background using foam tape then added Diamond Stickles glue.  The sparkles against the dark background is very beautiful in person.  Sentiment is from Season's Greetings.  

Thanks for stopping by.  Have a great day!


I'm submitting this card to Virginia's View Challenge #21: Glitter

Holly and Berry Christmas Card

Hello,

Today, I'm sharing a clean and simple Christmas card using Crafter's Companion's stamp sets: Joy & SpiritSeason's Greetings.  I stamped the holly and berry image in Memento Bamboo Leaves and colored them with Spectrum Noir markers in DG2 and CG1.  The sentiment was from stamped and adhered using foam tape.  I added red glitter glue on the berries for dimension and sparkles.

Thanks so much for stopping by, have a great day!


Winter/Holiday Coffee Lovers Blog Hop

Hello friends,

I made this card to participate in the Winter/Holiday Coffee Lovers Blog Hop.  These stamp sets are by The Alley Way Stamps: SweeTea, and Point of View... that were just released earlier this month.  The entire TAW site is 40% off right now.  Come check it out!  

My cup and flower were colored with Copic markers.

Thanks for stopping by, have hopping!!!


Paper Sweeties December 2015 Challenge

Hello,

Here's the card I created for Paper Sweeties December Challenge using Stitched Tags #3 stamp and die.  The contrast of gold, and red is just gorgeous.  I used mixed color sequins to represent that contrast.  The present was stamped then die cut.  I added some green Copic around the edges.  I hope to see you playing along with us!

Thanks for stopping by, have a great day!


Season's Greetings by Crafter's Companion

Hello,

I have another Christmas card to share.  This one was made with CC's stamp sets: Joy & Spirit and Season's Greetings.  I colored the image with the newly released Spectrum Noir Sparkle Pens: Holy Leaf, Red Berry, Moonstone, and Pink Champagne.  

Thanks for stopping my.  Have a great Monday!


The Alley Way Stamps December 2015 Blog Hop

Hello and Welcome to The Alley Way Release Blog Hop!

Today's card was made with a new set called Melt Your Heart Out.  I used the snowflake to create the background.  I stamped and colored my snowman with Copic.  Sentiment is from the set Happy Everything.


TAWS December 2015 Sneak Peak - A VERY LAST Release

Hello friends,

As you have seen the announcement on TAWS' website, TAWS is closing its door.  December will be the very last release.  I now will treasure my TAWS stamps even more.

Today, I'm sharing a sneak peek of a set called Happy Everything.  I stamped and white embossed my sentiment on 3 different colored card stock pieces, trimmed them and adhered them over a snowy background.  The blue background is distress ink.

Thanks so much for stopping by, have a great day!


Embossed Christmas Card

 Hello friends,

I hope you've had a great Thanksgiving and lovely time with your friends and family.  Now that Thanksgiving is over, it's busy time to put on Christmas decorations.  

Today I'm sharing a simple Christmas card using an embossing folder called O'Christmas Tree by Crafter's Companion.  I simply embossed a piece of card stock, slightly off to the side.  Next, I added the sentiment from Joy & Spirit.  Few blue rhinestone for the tree and voila it's done :).

Thanks so much for stopping by, have a great day!


Thinking of You!

Hello friends,

I hope you've had a wonderful time with your family on Thanksgiving.  This year, I baked honey glazed ham, instead of turkey.  It was a big hit, especially with my little ones.  They love ham with cinnamon apple on top.  I'm drooling just to talk about food :).  Let's get to the card I made!

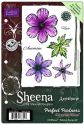
This card was made using the CC stamps sets called Floral Fancies and Dreamy Daisies.  I really love the delicate details of this floral image.  Uh I don't even know what type of flower this is.  Can someone tell me please?

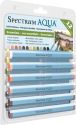
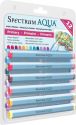
I stamped the images and colored them with Spectrum Noir: BP6, BP2, PP1, DG3, CG2, and CG1.  For the sentiment, I white embossed it on a piece of black card stock.  I adhered the sentiment on vellum and trimmed it.  Then the sentiment was adhered over the floral background using foam tape.

Thanks for stopping by, have a wonderful day!


Christmas Ornament Card

Hello friends,

Today I'm sharing an ornament card using a stamp set by Crafter's Companion: Jingle Bells


Here are the steps to make this card:

Step 1: On a piece of card stock, stamp the images (Jingle Bells) in Cottage Ivy and Lady Bug

Step 2: Fussy cut the images

Step 3: Make 2 bows using hem cord and adhere on top of the round images to make them look like ornaments

Step 4: Arrange the ornaments on the card base to the desired location, and measure the distance from the top of the ornament to the top of the card base

Step 5: Cut 2 pieces of hem cord a little longer than the measurement in step 4 and adhere behind the ornaments

Step 6: Adhere the ornaments on the card base and add a strip of gold glittered card stock on the top

Thanks so much for stopping by, have a very Happy Thanksgiving!

I'll Follow You Anywhere

Hello,

Today, I'm sharing a card made with TAWS' Just Ducky.  The images were stamped and colored with Copic markers.  The waves die are from Avery Elle.

Thanks so much for stopping by, have a great day!


Floral Hello Card

Hello,

Today I am sharing a card using TAWS stampe sets: Fancy Pants, Rain or Shine, and Wispy Wishes.  With a stencil, I created the blue waves using distress ink.  I stamped, cut and colored my images with Copic markers.  I adhered them on my card using foam tape, and finally added a sentiment.

Thanks so much for stopping by, have a wonderful weekend!


Paper Sweeties November 2015 Release Rewind!

Hello friend, and welcome back.  It's Paper Sweeties Release Rewind Day.  

Today, I'm sharing a card that combines a new and a previous released stamp/die sets.  I am combining the new set Dear Santa, and previously released set Do you see what I see?.   

I stamped my images with Wild Honey distress ink.  I traced the outlines with Spectrum Aqua marker in gold and used a watercolor brush to even out the color on the entire image.  I die cut "merry" (PTI) and adhered on the background.  "Christmas" sentiment is from the set Do you see what I see?  I adhered them over the background using foam tape.  Finally, I added few clear sequins.

Please check out our DT for more beautiful inspiration.  Thanks for stopping by!


Paper Sweeties November 2015 Release Party

Hello friends and welcome to Paper Sweeties November 2015 Release Party!  All newly released products are available for purchase at the store.  Here is the list of our new products:
Today, I'm sharing a card using Stitched Tags #3 Sweet Cuts, and Dear Santa.  I found this holiday patterned paper for the stocking, so I simply used Stitched Tags #3 Sweet Cuts to cut them.  I hung them on a red & white twine and added some foam tape behind.  Lastly, a sentiment from Dear Santa to finish the look.  

Thanks for stopping by, please visit other DT members for more inspiration!  See below for the complete list.


Let's the Christmas Card Making Frenzy Begin!

Hello friends and Happy Saturday!

Here's one of the Christmas card I made for this season.  I used 2 of TAWS sets called: Mistletoe Kisses, Wreathed in Love

First I started stamping the holy leaves with versamark all over the kraft card base, and embossed it in white.  On a piece of vellum, I stamped the wreath, embossed it with Zing Leaf embossing powder and cut it using my Scan-n-Cut machine.  Next, I added few red gems and a sentiment banner.  My wreath is adhered to the base using foam tape.  

Thanks so much for stopping by, have a wonderful weekend!


Paper Sweeties November 2015 Release Count Down

Hello friends and welcome back!  Today we are counting down to Paper Sweeties November 2015 Release Count Down.  

To make this card, I first created the blue background on the top part of the card base using distress ink, a snow fall stencil and embossing paste.  Set aside to let it dry.  

Next I stamped a the fireplace.  I decide to stamped just a part of the fireplace to make it interesting.  I colored my fire place with Copic markers.  Finally a sentiment to finish off the look.  

Thanks so much, please come back tomorrow for the Release Party.  Don't forget to stop by other DT members' blog for more inspiration.


Paper Sweeties November 2015 Release Sneak Peeks!

Hello friends... It's Sneak Peek day at Paper Sweeties.  

Today, I'm sharing a simple card using the new sets: Dear Santa, and Days Until.  These sets will be available on 11/15.  

Thanks so much for stopping by.  For more Sneak Peeks, please check out our DT's pages below.


A Special Wish

Hello,

Today I have a project to share with you.  I used several Crafter's Companion products on this card:  Butterfly Silk stamp set, Pop Dotty Decorative Stencil, Spectrum Aqua markers in Scarlet, Gold, and Sepia.

- I started out with adding the stencil pattern on the edge of my card base.  
- On a piece of watercolor cardstock, I created the blue watercolor background using Tumbled Glass distress ink and adhered on the card base.  
- On another piece of card stock, I stamped and color the lady using Spectrum Aqua markers.  Next, I cut and adhered the lady image over the blue panel using foam tape.  
- Finally, I added the sentiment and few clear sequins.

Thanks so much for stopping by, have a great day!


A Birthday Card By TAWS

Hello friends,

I have a birthday card to share today.  I made this for my sister, whose birthday is this weekend.  

I first distressed the top part of my card base with Wild Honey.  Next, I stamped my leaves and cut them using my Scan-n-Cut.  Once done cutting, I adhered them over the card base.  Few clear sequins and the sentiment finished off the look.

Thanks so much for stopping by, have a great day!


25 Days of Christmas Tags Blog Hop

Hello friends,

I made these tags for 25 Days of Christmas Tags Blog Hop.  I used Sweet Cuts Stitched Tags #2 by Paper Sweeties to die cut the tags.  Next, I stamped and embossed the sentiment (PTI) and added distress ink in Evergreen Bough.  The bows were cut from glittered paper.  I adhered on top and added the twine.  

Thanks so much for stopping by.  Please visit our DT's pages for more inspiration!  


Design Team


You Color Our World

Hello,

Today, I'm sharing a card made with TAWS sets: Rain or Shine and From US.  I started out with stamping my paper airplanes then colored them with different colors of Copic markers.  Next, I stamped my sentiment on black cardstock and embossed it with white embossing powder.  I cut the sentiment into 3 parts and adhered on my card using foam tape.  Finally, I added few enamel dots.

Thanks so much for stopping by, have a great weekend!


Great News!!

Good morning everyone,

I have some great news to share: I will be joining Crafter's Companion Design Team.  It is such an honor to be part of a group of super talented ladies.  

Let's get to the card I made for today.

- On a piece of A2 cardstock, I partially embossed the bottom part and set aside.  
- Next I stamped my flowers and leaves on Spectrum Aqua Watercolor cardstock using Antique Linen Distress Ink.  The stamps are from Anemone stamp set.  This my my fist time using this cardstock and really like it.  Since my flowers are colored in, you can't see the difference, but this cardstock is whiter than the one found at local craft stores.  
- I colored them using Spectrum Aqua markers in aquamarine, orange, yellow and moss.  After cutting these flowers and leaves out, I adhered them just above the embossed area on my card stock.
- Finally, I added the sentiment from Butterfly Silk set and adhered the panel over the card base. 

That's it for today.  Thank you so much for stopping by.  Have a wonderful week!!